
Klustron 集群部署实战
Klustron 集群部署实战
01 架构介绍和术语说明
1.1 架构介绍
Klustron 系统架构:
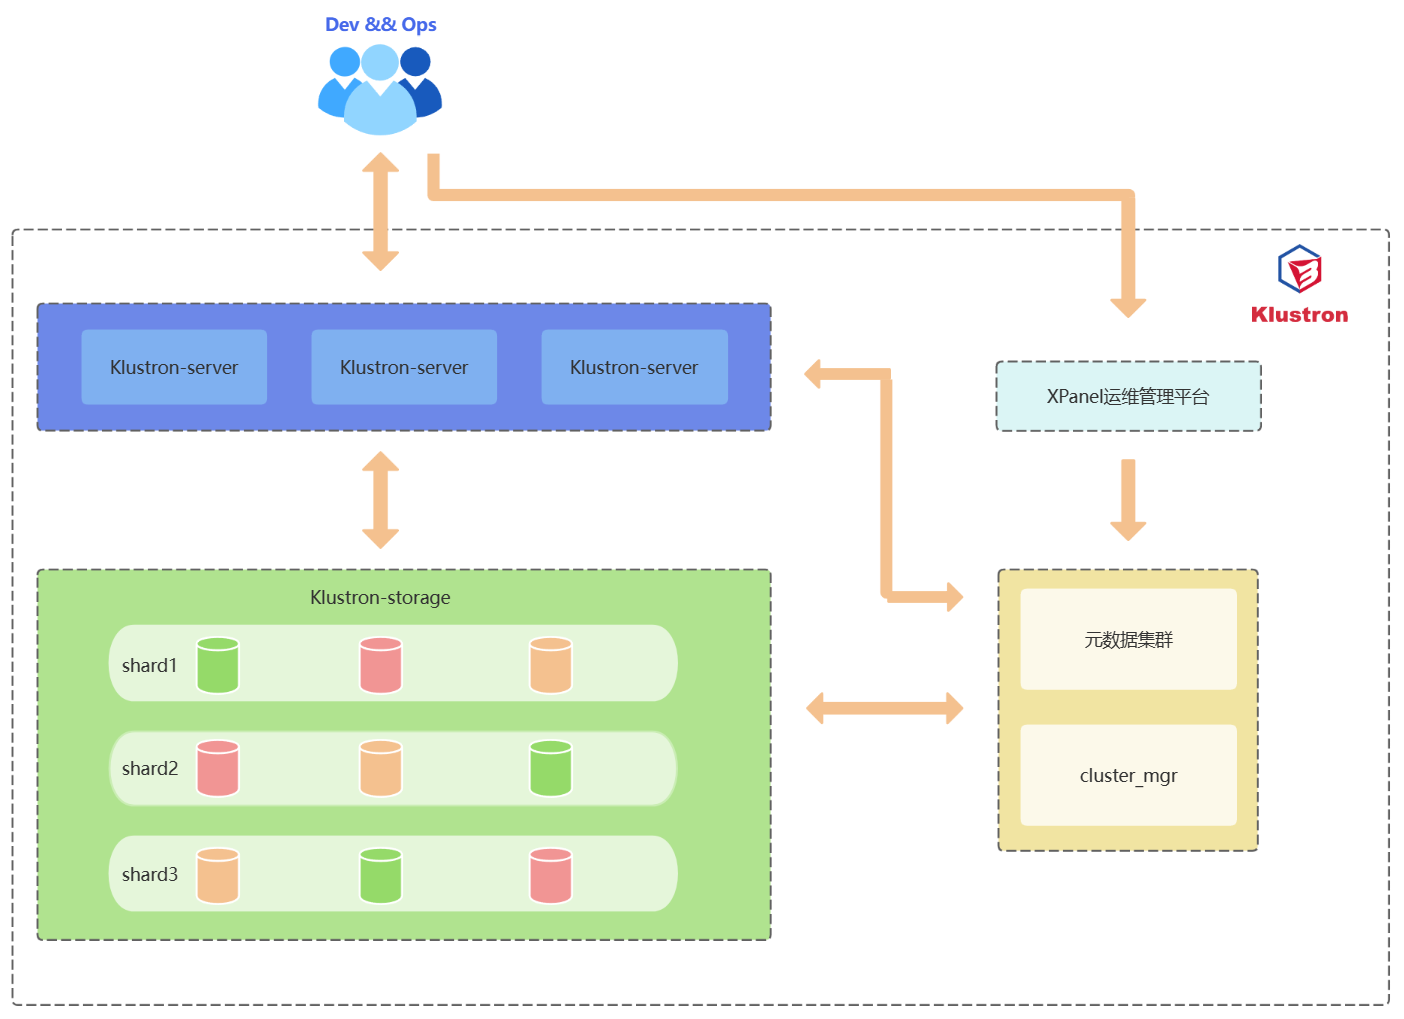
1.2 组件介绍
Klustron集群组件介绍:
| 组件名称 | 功能 |
|---|---|
| Klustron-server | 计算节点,负责接收应用客户端请求,完成查询解析、优化、执行和合并处理存储节点返回的中间结果,最终返回客户端结果。计算节点不存储用户数据,但是存储用户的元数据。常规使用方式是在负载均衡器中配置一个集群的多个计算节点,当有计算节点发生故障或者退出,负载均衡层会将请求发送到其他正常的计算节点,继续提供来自应用客户端请求服务。 |
| Klustron-storage | 存储集群,负责实现数据持久化、金融级数据一致性。存储集群由2个或以上shard组成,每一个shard是3副本,1个master和2个slave。主节点接受来自计算节点的读写请求,执行请求并返回结果给计算节点。 |
| 元数据集群 | 负责存储Klustron集群的元数据信息,包括拓扑结构、节点连接信息、DDL日志,commit log,和其他集群管理日志。 |
| cluster_mgr | 负责维护正确的集群和节点状态,实现集群管理、集群逻辑备份和恢复, 集群物理备份和恢复、水平弹性伸缩等功能。 |
| XPanel | GUI 工具软件,提供网页集群管理平台,让DBA通过点击鼠标就可以轻松完成绝大部分的数据库运维管理工作。 |
| node_mgr | node_mgr负责将cluster_mgr下发的操作在对应的机器节点上执行命令,以及定时上报集群主节点的心跳信息。每一台机器节点都存在一个node_mgr。 |
1.3 术语说明
Klustron术语介绍:
| 术语 | 解释 |
|---|---|
| 集群 /Cluster | 在Klustron中,集群由若干个计算节点和若干个存储集群shard组成,例如A集群由3个计算节点和2个存储集群shard组成。 |
| 计算节点/Klustron-server /CN(Computing Node) | 负责接收应用客户端请求,通过合并处理存储节点返回的结果,最终返回客户端结果。每个计算节点都是无状态且相互独立的,集群中有多个计算节点,且接入了负载均衡层,当单个计算节点故障时,不会对集群有影响,集群仍然持续提供读写服务。 |
| 存储集群 /Klustron-storage /Shard | 一个 Klustron 集群包含一个或者多个 shard, 每个 shard 存储一部分用户数据,不同 shard 存储的用户数据没有交集。每个 shard 有一个主节点和多个备机节点,主备节点通过 binlog 复制实现高可用。 |
| 存储节点 /Storage Node | 用于存储用户业务数据,是一个 kunlun-storage 组件的运行实例。若干个存储节点组成一个shard,在shard中作为主节点或者备节点运行。 |
| 元数据集群 /Metadata shard | 由多个存储节点组成的复制组,用于管理Klustron集群的元数据,不用于存储用户业务数据,元数据集群在运行时是一个复制组。可以服务多个Klustron集群。 |
| cluster_mgr /集群管理器 /Cluster Manager | 该节点负责接收客户端的Klustron集群操作和管理请求,通过将实际动作发送给各个节点管理器,来完成请求。 |
| XPanel | 一个 Web 应用程序,运行在 docker 镜像中,用户可以使用浏览器连接 XPanel 来执行集群管理操作。 |
| node_mgr /节点管理器 /Node Manager | 每台工作机器都需要部署的一个的本地命令执行节点,该节点将接收来自集群管理器的请求,针对存储节点、计算节点、以及Klustron在本机的其他组件执行各种操作,包括但不限于安装,删除,停止,备份等。 |
02 标准集群部署
2.1 部署前置要求
2.1.1 操作系统和CPU架构
| 操作系统版本 | CPU****的架构(x86_64/AMD64/ARM64) |
|---|---|
| CentOS 7.5及以上 | x86_64 ARM64 |
| CentOS 8 | x86_64 ARM64 |
| 统信服务器操作系统V20(1050a) | AMD64 ARM64 |
| 统信服务器操作系统V20(1050e) | AMD64 ARM64 |
| openSUSE 15 | x86_64 |
| Ubuntu 20.04 | x86_64 |
| Kylin v10 | x86_64 ARM64 |
2.1.2 服务器配置
测试和开发环境配置建议
对于开发和测试环境,建议至少使用三台机器,每台机器上可以部署多种类型的组件, 以下是各种组件的具体要求:
| 组 件 | CPU | 内存 | 磁盘类型及可用空间 | 网络 | 部署个数 | 部署说明 |
|---|---|---|---|---|---|---|
| Klustron-server | 4 | 8G+ | SAS,20G+ | 千兆网卡 | 1 | 可以与存储集群混合部署 |
| Klustron-storage | 4 | 8G+ | SAS,20G+ | 千兆网卡 | 1 | 1个存储集群至少包含3个节点,即一主两备 |
| 元数据集群 | 4 | 8G+ | SAS,20G+ | 千兆网卡 | 1 | 可以与存储集群混合部署 |
| cluster_mgr | 2 | 4G+ | SAS,20G+ | 千兆网卡 | 1 | 可以与存储集群混合部署 |
| XPanel | 2 | 4G+ | SAS,10G+ | 千兆网卡 | 1 | 可以与存储集群混合部署 |
| node_mgr | 1 | 2G+ | SAS,10G+ | 千兆网卡 | 1 | 每台机器都会自动部署 |
生产环境配置要求
对于生产环境,至少需要6台机器;机器资源足够时,建议使用9台机器,3台计算节点+6台存储节点,其他组件可以与存储节点混合部署;以下是各种组件的具体要求:
| 组 件 | CPU | 内存 | 磁盘类型及可用空间 | 网络 | 部署个数 | 部署说明 |
|---|---|---|---|---|---|---|
| Klustron-server | 16 | 32G+ | SSD,20G+ | 万兆网卡 | 3 | 独立部署 |
| Klustron-storage | 8 | 32G+ | SSD,200G+ | 万兆网卡 | 3 | 1个存储集群至少包含3个节点,即一主两备 |
| 元数据集群 | 4 | 8G+ | SSD,50G+ | 万兆网卡 | 1 | 可以与存储集群混合部署 |
| cluster_mgr | 4 | 8G+ | SSD,20G+ | 万兆网卡 | 1 | 可以与存储集群混合部署 |
| XPanel | 4 | 8G+ | SSD,10G+ | 万兆网卡 | 1 | 可以与计算节点混合部署 |
| node_mgr | 1 | 2G+ | SSD,10G+ | 万兆网卡 | 1 | 每台机器都会自动部署 |
2.1.3 网络配置
| 组 件 | 默认端口/端口范围 | 端口说明 |
|---|---|---|
| Klustron-server | 47000-48000 | 计算节点提供的pg或mysql客户端连接访问通信端口范围 |
| Klustron-storage | 57000-58000 | 存储节点通信端口范围 |
| 元数据集群 | 6001 | 元数据集群访问通信端口 |
| cluster_mgr | 58000 | cluster_mgr的raft协议端口 |
| cluster_mgr | 58001 | cluster_mgr的http协议端口 |
| cluster_mgr | 59010 | cluster_mgr 默认的 prometheus 端口 |
| XPanel | 18080 | XPanel运管平台服务访问端口 |
| node_mgr | 58002 | node_mgr默认的http端口 |
| node_mgr | 58003 | node_mgr默认的tcp端口 |
| node_mgr | 58010 | node_mgr默认的 prometheus 端口 |
2.2 在线部署
2.2.1 部署前准备工作-所有机器操作
步骤的准备工作需要在每台机器上进行操作。
清理系统安装自带的MariaDB
使用root用户运行下面的命令:
yum remove postfix
rpm -e mariadb-libs
关闭防火墙
在root用户下执行命令:
systemctl stop firewalld
systemctl disable firewalld
创建kunlun组和kunlun用户
使用root执行命令并设置用户密码:
useradd --create-home --shell /bin/bash kunlun
passwd kunlun
创建相关目录并设置所属组
创建软件安装目录 /data1/kunlun,可根据用户定义的规范进行创建即可,这里以磁盘挂载到/data1目录为例,并将目录的属组设置为 kunlun:kunlun。
使用 root 执行下面的命令:
mkdir -p /data1/kunlun /data1/softwares

# /data1/kunlun为各组件安装完成后的目录,/data1/softwares为部署前所存放安装包、相关脚本和文件的目录

chown -R kunlun:kunlun /data1/kunlun /data1/softwares
修改系统文件句柄数
使用root执行下面的命令:
vim /etc/security/limits.conf
#在文件最后一行的下面加入:
* soft nofile 65536
* hard nofile 200000
设置kunlun用户sudo免密执行root命令
使用root执行下面的命令:
visudo
# 在最后加上下面的内容:
kunlun ALL=(ALL) NOPASSWD: ALL
2.2.2 部署前准备工作-中控机操作
该步骤的准备工作只需要在中控机上进行操作。
中控机与其他机器配置SSH互信
以kunlun用户在中控机执行下面的命令:
ssh-keygen -t rsa
运行该命令后,在所有需要输入的地方直接回车就可以了。成功后会在/home/kunlun/目录下的.ssh目录中生成 id_rsa 和 id_rsa.pub 两个文件,其中 id_rsa 是存放私钥的文件,而 id_rsa.pub 则为存放公钥的文件。
将中控机的公钥复制到其他服务器上,包括中控机本机:
ssh-copy-id -i ~/.ssh/id_rsa.pub 192.168.40.151
ssh-copy-id -i ~/.ssh/id_rsa.pub 192.168.40.152
ssh-copy-id -i ~/.ssh/id_rsa.pub 192.168.40.153
验证中控机上执行命令验证kunlun用户到其他机器上的免密登陆:
ssh 192.168.40.151 date
ssh 192.168.40.152 date
ssh 192.168.40.153 date
安装python2,git和wget等工具
使用root执行下面的命令:
yum -y install python git wget yum-utils
部署XPanel
由于计划在中控上部署XPanel,需要提前安装和部署docker。
使用root执行下面的命令:
清除系统自带的docker相关的rpm:
yum remove docker \
        docker-client \
        docker-client-latest \
        docker-common \
        docker-latest \
        docker-latest-logrotate \
        docker-logrotate \
        docker-engine
切换阿里镜像:
yum-config-manager --add-repo http://mirrors.aliyun.com/docker-ce/linux/centos/docker-ce.repo
安装docker社区版:
yum -y install docker-ce docker-ce-cli containerd.io
启动docker,并设置其随操作系统自启动:
systemctl start docker
systemctl enable docker
下载最新部署工具
将部署工具下载到/data1/softwares目录下,使用root用户执行:
cd /data1/softwares
git clone -b 1.1 https://gitee.com/zettadb/cloudnative.git
下载安装需要的软件包
使用root执行下面的命令:
cd /data1/softwares/setuptools-36.5.0/cloudnative/cluster/clustermgr
wget http://klustron.cn:14000/thirdparty/hadoop-3.3.1.tar.gz
wget http://klustron.cn:14000/thirdparty/jdk-8u131-linux-x64.tar.gz
wget http://klustron.cn:14000/thirdparty/mysql-connector-python-2.1.3.tar.gz
wget http://klustron.cn:14000/thirdparty/prometheus.tgz
wget http://klustron.cn:14000/thirdparty/haproxy-2.5.0-bin.tar.gz
wget http://klustron.cn:14000/thirdparty/efk/filebeat-7.10.1-linux-x86_64.tar.gz


VERSION=1.1.2
wget http://downloads.Klustron.com//releases/$VERSION/release-binaries/kunlun-cluster-manager-$VERSION.tgz
wget http://downloads.Klustron.com//releases/$VERSION/release-binaries/kunlun-node-manager-$VERSION.tgz
wget http://downloads.Klustron.com//releases/$VERSION/release-binaries/kunlun-server-$VERSION.tgz
wget http://downloads.Klustron.com//releases/$VERSION/release-binaries/kunlun-storage-$VERSION.tgz
wget http://downloads.Klustron.com//releases/$VERSION/release-binaries/kunlun-proxysql-$VERSION.tgz

chown -R kunlun:kunlun /data1/softwares/
2.2.3 部署安装
编辑部署拓扑json文件
中控机上使用kunlun用户修改文件/data1/softwares/setuptools-36.5.0/cloudnative/cluster/cluster_and_node_mgr.json ,加入相关的配置信息,这里以192.168.40.151(中控机),192.168.40.152,192.168.40.153三台机器为例。
{
    "machines":[
        {
            "ip":"192.168.40.151",
            "basedir":"/data1/kunlun",
            "user":"kunlun"
        },
        {
            "ip":"192.168.40.152",
            "basedir":"/data1/kunlun",
            "user":"kunlun"
        },
        {
            "ip":"192.168.40.153",
            "basedir":"/data1/kunlun",
            "user":"kunlun"
        }
    ],
    "meta":{
        "ha_mode": "rbr",
        "nodes":[
         {
         "ip":"192.168.40.151"
                },
                {
         "ip":"192.168.40.152"
                },
                {
         "ip":"192.168.40.153"
                }
        ]
    },
    "cluster_manager": {
           "nodes": [
        {
         "ip": "192.168.40.151"
        },
        {
         "ip": "192.168.40.152"
        },
        {
         "ip": "192.168.40.153"
        }
        ]
    },
    "node_manager": {
           "nodes": [
        {
         "ip": "192.168.40.151"
        },
        {
         "ip": "192.168.40.152"
        },
        {
         "ip": "192.168.40.153"
        }
        ]
    },
    "xpanel": {
    "ip": "192.168.40.151",
    "image": "registry.cn-hangzhou.aliyuncs.com/kunlundb/kunlun-xpanel:1.1.2"
    }
}
执行安装
生成安装脚本
中控机使用kunlun用户执行下面的命令:
cd /data1/softwares/setuptools-36.5.0/cloudnative/cluster
sudo python2 setup_cluster_manager.py --autostart --config=cluster_and_node_mgr.json --product_version=$version --action=install
# $version是指需要安装的集群版本号,例如:1.1.2
示例:
sudo python2 setup_cluster_manager.py --autostart --config=cluster_and_node_mgr.json --product_version=1.1.2 --action=install
运行安装脚本
中控机使用kunlun用户执行下面的命令:
bash -e /data1/softwares/setuptools-36.5.0/cloudnative/cluster/clustermgr/install.sh
登陆XPanel进行集群创建
浏览器上登陆XPanel控制台,在能访问192.168.40.151的机器上打开浏览器,输入地址:http://192.168.40.151:18080/KunlunXPanel
初次登录用户名和密码是:super_dba/super_dba,初次登陆需要修改super_dba密码。
登录后,首页显示如下:
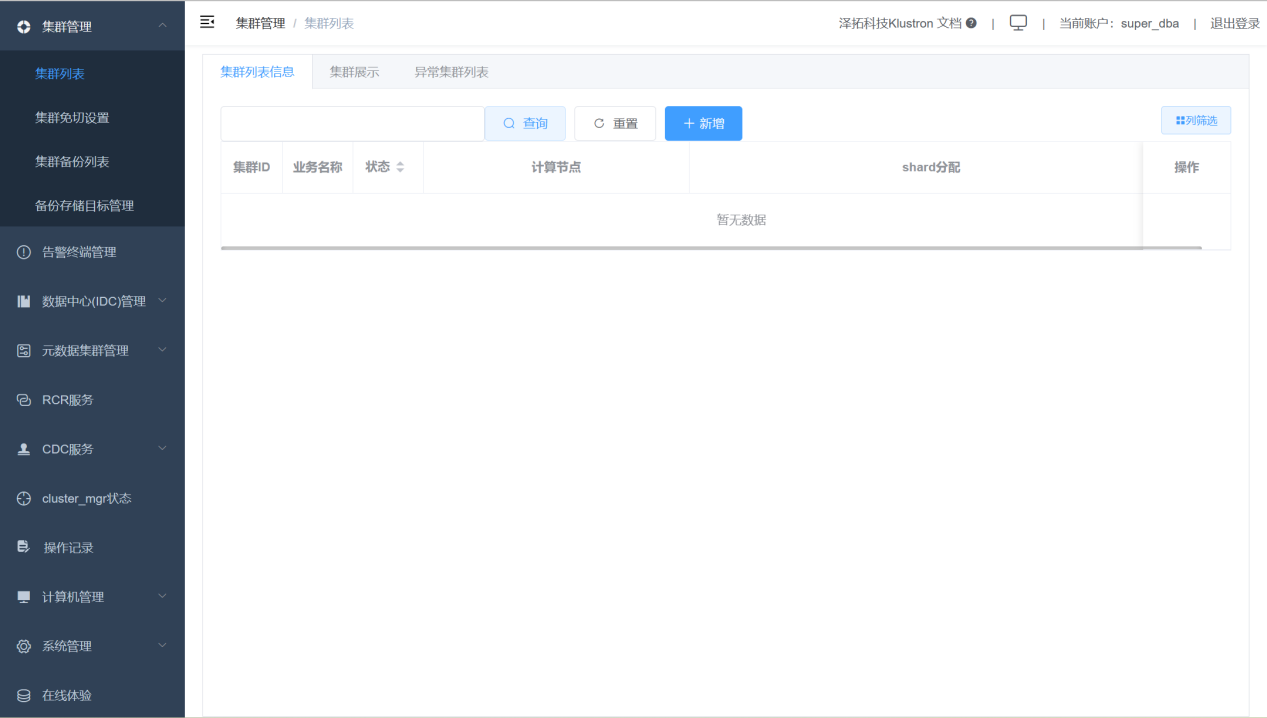
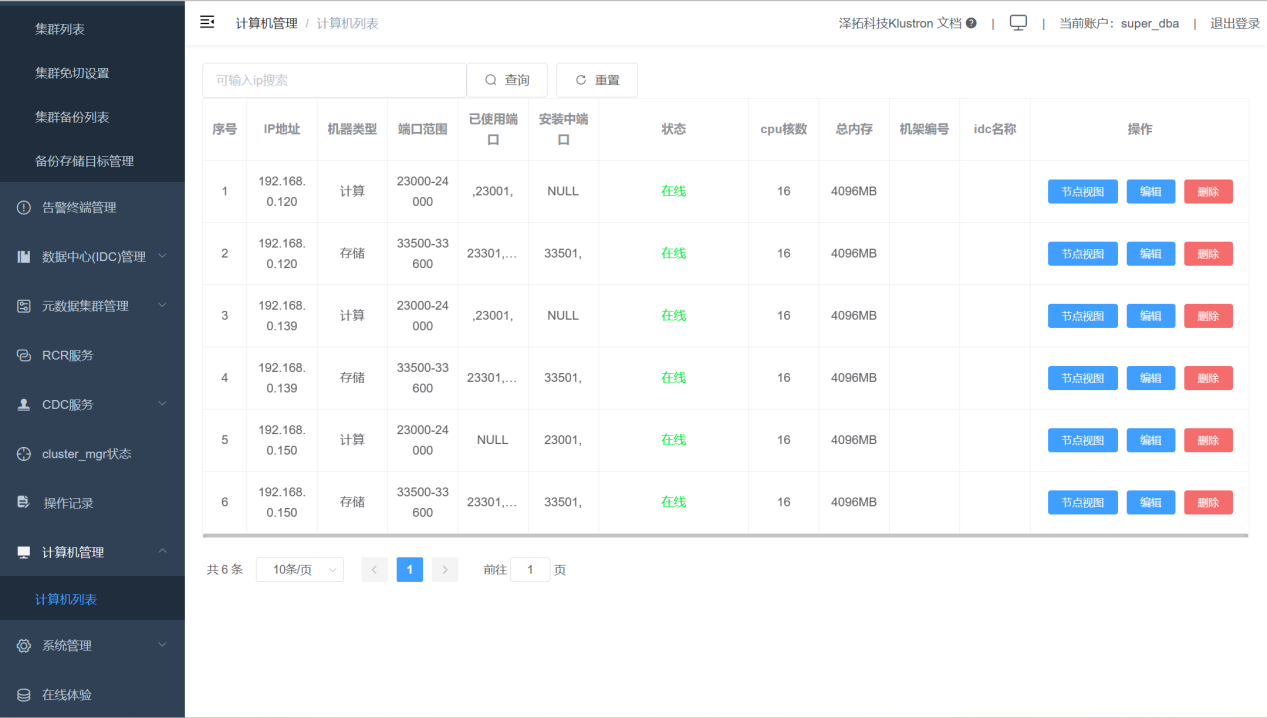
点击左边控制栏“计算机管理”“计算机列表”,显示下面的界面。
检查所有的机器处于在线状态:
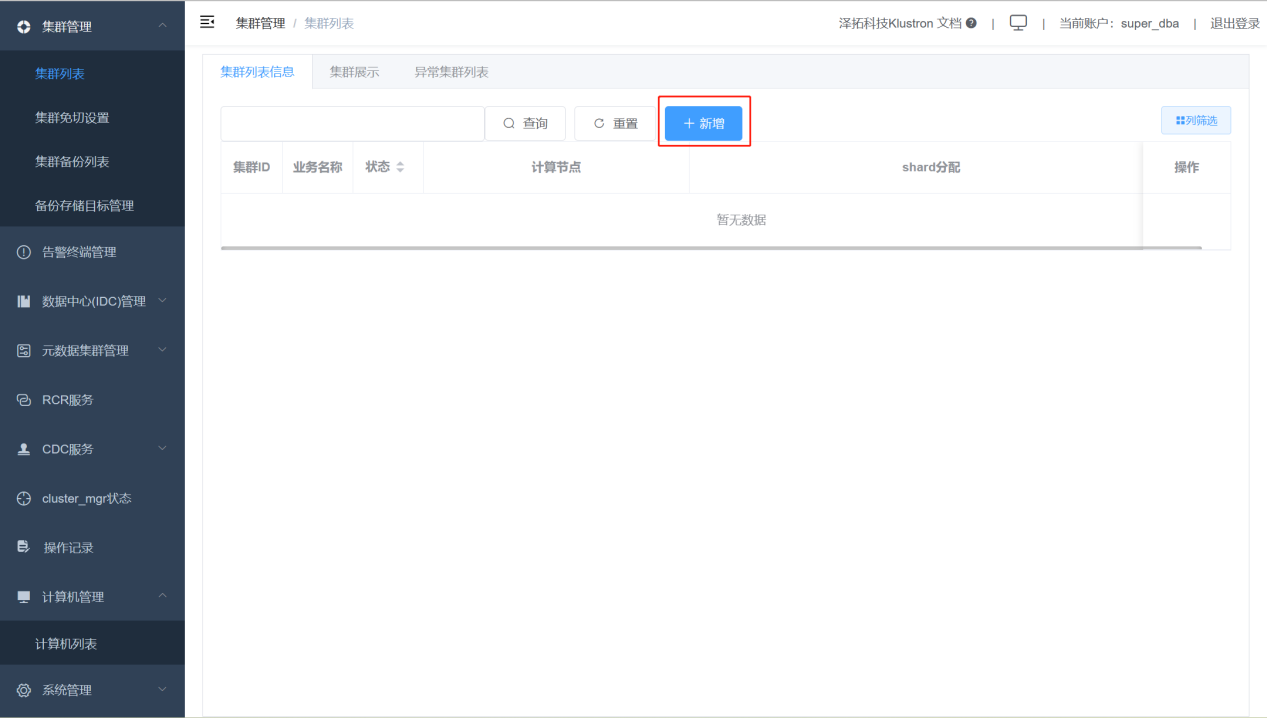
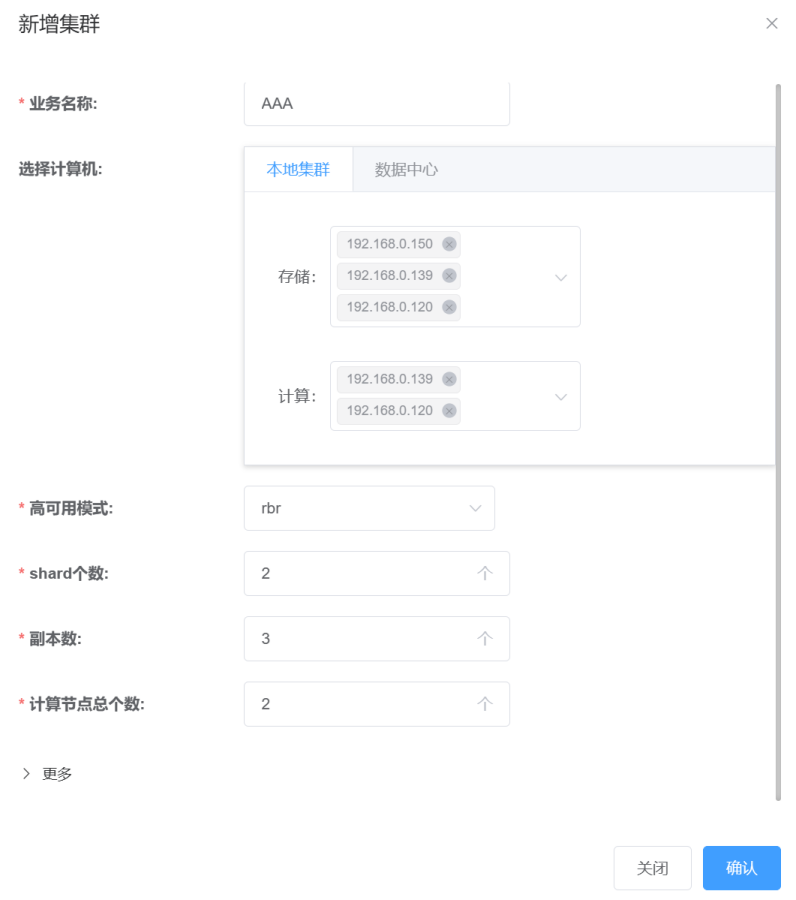
增加集群。
点击“集群管理”,“集群列表”,再点击“新增”按钮
添加集群参数如下图:

完成集群安装后,通过连接计算节点的ip和port,默认用户名和密码都是abc,就可以使用Klustron Cluster了,登录后用户根据需求进行用户的创建和密码的修改。
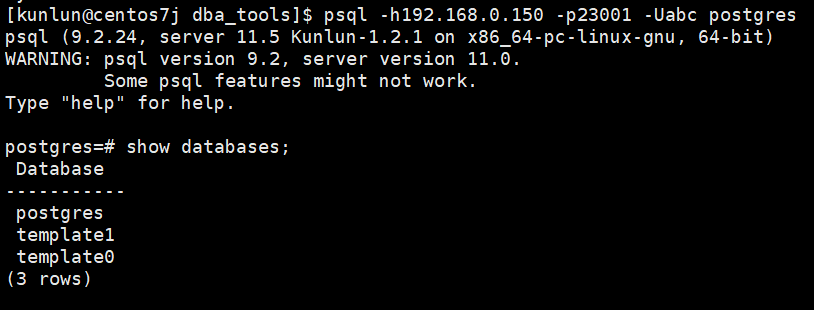
pg和mysql协议登录验证
Tips :postgresql协议和mysql协议登录访问的端口号不同,具体见XPanel中【集群列表】->【设置】->【计算节点列表】。
Postgresql登录验证:
psql -h192.168.0.150 -p23001 -Uabc postgres
如图:
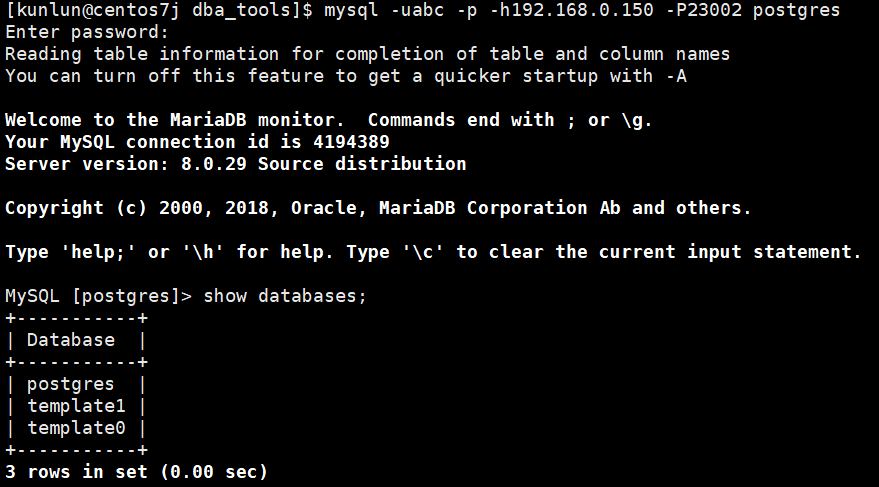
mysql登录验证:
mysql -uabc -p -h192.168.0.150 -P23002 postgres
如图:
2.3 离线部署
2.3.1 部署前准备工作-所有机器操作
该步骤的准备工作需要在每台机器上进行操作。
清理系统安装自带的MariaDB
使用root用户运行下面的命令:
yum remove postfix
rpm -e mariadb-libs
关闭防火墙
在root用户下执行命令:
systemctl stop firewalld
systemctl disable firewalld
创建kunlun组和kunlun用户
使用root执行命令并设置用户密码:
useradd --create-home --shell /bin/bash kunlun

passwd kunlun
创建相关目录并设置所属组
创建软件安装目录 /data1/kunlun,可根据用户定义的规范进行创建即可,这里以磁盘挂载到/data1目录为例,并将目录的属组设置为 kunlun:kunlun。
使用 root 执行下面的命令:
mkdir -p /data1/kunlun /data1/softwares
# /data1/kunlun为各组件安装完成后的目录,/data1/softwares为部署前所存放安装包、相关脚本和文件的目录**
chown -R kunlun:kunlun /data1/kunlun /data1/softwares
修改系统文件句柄数
使用root执行下面的命令:
vim /etc/security/limits.conf
#在文件最后一行的下面加入:
* soft nofile 65536

* hard nofile 200000
设置kunlun用户sudo免密执行root命令
使用root执行下面的命令:
visudo
#在最后加上下面的内容:
kunlun ALL=(ALL) NOPASSWD: ALL
2.3.2 部署前准备工作-中控机操作
该步骤的准备工作只需要在中控机上进行操作。
中控机与其他机器配置SSH互信
以kunlun用户在中控机执行下面的命令:
ssh-keygen -t rsa
运行该命令后,在所有需要输入的地方直接回车就可以了。成功后会在/home/kunlun/目录下的.ssh目录中生成 id_rsa 和 id_rsa.pub 两个文件,其中 id_rsa 是存放私钥的文件,而 id_rsa.pub 则为存放公钥的文件。
将中控机的公钥复制到其他服务器上,包括中控机本机:
ssh-copy-id -i ~/.ssh/id_rsa.pub 192.168.40.151
ssh-copy-id -i ~/.ssh/id_rsa.pub 192.168.40.152
ssh-copy-id -i ~/.ssh/id_rsa.pub 192.168.40.153
验证中控机上执行命令验证kunlun用户到其他机器上的免密登陆:
ssh 192.168.40.151 date
ssh 192.168.40.152 date
ssh 192.168.40.153 date
安装python2,git和wget等工具
使用root执行下面的命令:
yum -y install python git wget yum-utils
安装docker服务
由于计划在中控上部署XPanel,需要提前安装和部署docker。
使用root执行下面的命令:
清除系统自带的docker相关的rpm:
yum remove docker \
        docker-client \
        docker-client-latest \
        docker-common \
        docker-latest \
        docker-latest-logrotate \
        docker-logrotate \
        docker-engine
安装docker社区版:
yum -y install docker
启动docker,并设置其随操作系统自启动:
systemctl start docker
systemctl enable docker
上传安装工具及安装包到服务器
通过在线环境下载并打包最新部署工具和安装包,或者通过Klustron 团队咨询后下载对应的离线部署包
在线下载并打包(这里以 v1.2.2 版本为例,对应的版本下载以实际的为准):
将部署工具下载到/data1/softwares目录下,使用root用户执行:
cd /data1/softwares
git clone -b 1.1 https://gitee.com/zettadb/cloudnative.git
下载安装需要的软件包
使用root执行下面的命令:
cd /data1/softwares/setuptools-36.5.0/cloudnative/cluster/clustermgr
wget http://klustron.cn:14000/thirdparty/hadoop-3.3.1.tar.gz
wget http://klustron.cn:14000/thirdparty/jdk-8u131-linux-x64.tar.gz
wget http://klustron.cn:14000/thirdparty/mysql-connector-python-2.1.3.tar.gz
wget http://klustron.cn:14000/thirdparty/prometheus.tgz
wget http://klustron.cn:14000/thirdparty/haproxy-2.5.0-bin.tar.gz
wget http://klustron.cn:14000/thirdparty/efk/filebeat-7.10.1-linux-x86_64.tar.gz


VERSION=1.2.2
wget http://downloads.Klustron.com//releases/$VERSION/release-binaries/kunlun-cluster-manager-$VERSION.tgz
wget http://downloads.Klustron.com//releases/$VERSION/release-binaries/kunlun-node-manager-$VERSION.tgz
wget http://downloads.Klustron.com//releases/$VERSION/release-binaries/kunlun-server-$VERSION.tgz
wget http://downloads.Klustron.com//releases/$VERSION/release-binaries/kunlun-storage-$VERSION.tgz
wget http://downloads.Klustron.com//releases/$VERSION/release-binaries/kunlun-proxysql-$VERSION.tgz

chown -R kunlun:kunlun /data1/softwares/
2.3.3 部署安装
编辑部署拓扑json文件
中控机上使用kunlun用户修改文件/data1/softwares/setuptools-36.5.0/cloudnative/cluster/cluster_and_node_mgr.json ,加入相关的配置信息,这里以192.168.40.151(中控机),192.168.40.152,192.168.40.153三台机器为例。
与在线部署的不同之处在于XPanel部分,离线部署没有"image"属性,只有"imageType": "file"属性。
{
    "machines":[
        {
            "ip":"192.168.40.151",
            "basedir":"/data1/kunlun",
            "user":"kunlun"
        },
        {
            "ip":"192.168.40.152",
            "basedir":"/data1/kunlun",
            "user":"kunlun"
        },
        {
            "ip":"192.168.40.153",
            "basedir":"/data1/kunlun",
            "user":"kunlun"
        }
    ],
    "meta":{
        "ha_mode": "rbr",
        "nodes":[
         {
         "ip":"192.168.40.151"
                },
                {
         "ip":"192.168.40.152"
                },
                {
         "ip":"192.168.40.153"
                }
        ]
    },
    "cluster_manager": {
           "nodes": [
        {
         "ip": "192.168.40.151"
        },
        {
         "ip": "192.168.40.152"
        },
        {
         "ip": "192.168.40.153"
        }
        ]
    },
    "node_manager": {
           "nodes": [
        {
         "ip": "192.168.40.151"
        },
        {
         "ip": "192.168.40.152"
        },
        {
         "ip": "192.168.40.153"
        }
        ]
    },
    "xpanel": {
    "ip": "192.168.40.151",
    "imageType": "file"
    }
}
执行安装
生成安装脚本
中控机使用kunlun用户执行下面的命令:
cd /data1/softwares/setuptools-36.5.0/cloudnative/cluster
sudo python2 setup_cluster_manager.py --autostart --config=cluster_and_node_mgr.json --product_version=$version --action=install
# $version 是指需要安装的集群版本号,例如:1.2.2
示例:
sudo python2 setup_cluster_manager.py --autostart --config=cluster_and_node_mgr.json --product_version=1.2.2 --action=install
运行安装脚本
中控机使用kunlun用户执行下面的命令:
bash -e /data1/softwares/setuptools-36.5.0/cloudnative/cluster/clustermgr/install.sh
登陆XPanel进行集群创建
浏览器上登陆XPanel控制台,在能访问192.168.40.151的机器上打开浏览器,输入地址:http://192.168.40.151:18080/KunlunXPanel
初次登录用户名和密码是:super_dba/super_dba,初次登陆需要修改super_dba密码。
登录后,首页显示如下:
点击左边控制栏“计算机管理”“计算机列表”,显示下面的界面。
检查所有的机器处于在线状态:
增加集群。
点击“集群管理”,“集群列表”,再点击“新增”按钮
添加集群参数如下图:
完成集群安装后,通过连接计算节点的ip和port,默认用户名和密码都是abc,就可以使用Klustron Cluster了,登录后用户根据需求进行用户的创建和密码的修改。
pg和mysql协议登录验证
Tips :postgresql协议和mysql协议登录访问的端口号不同,具体见XPanel中【集群列表】->【设置】->【计算节点列表】。
Postgresql登录验证:
psql -h192.168.0.150 -p23001 -Uabc postgres
如图:
mysql登录验证:
mysql -uabc -p -h192.168.0.150 -P23002 postgres
如图:
2.4 其他组件部署
2.4.1 HDFS部署
HDFS单节点部署
HDFS集群部署