
KlustronDB Cluster Installation Guide
KlustronDB Cluster Installation Guide
This article uses the cluster management system installation script to install the cluster management system
Note: Unless otherwise specified, the version numbers in the text can be replaced with the version numbers of any released version. For all released versions, see: Release Notes
1. KlustronDB Environment Information
 Note: The Linux version used in practice in this installation manual is CentOS 7.9 64bit
2. Preparatory Work Before Installation
2.1 [kunlun1, kunlun2, kunlun3] Clean the MariaDB that comes pre-installed with the system.
This step is an optional precautionary measure and it is recommended to skip it directly, only re-executing it if a third-party library version conflict occurs. The reason for cleaning MariaDB is to avoid, in certain versions of Linux distributions, the small possibility that some third-party libraries used by KlustronDB may conflict with those used by MariaDB. Previous KlustronDB users have reported such conflicts. Similarly, other software may also have similar component version conflicts with KlustronDB, and if that happens, that software will need to be removed.
If MariaDB on the user's server cannot be cleaned, this step can be skipped for now, as the likelihood of an actual version conflict occurring is very low.
Run the following command as the root user:
yum remove postfix
rpm -e mariadb-libs
2.2 [kunlun1, kunlun2, kunlun3] Turn off the firewall on each server.
This is because the KlustronDB database installation tool needs to copy KlustronDB program files to multiple servers and use SSH to connect to each server to execute operating system commands. After the KlustronDB cluster is installed, the firewall can be re-enabled, and it is essential to open the ports that KlustronDB components listen to. These ports are automatically assigned by the KlustronDB installer within the port range specified by the user. After the cluster is up and running, the user can check the ports being used to allow KlustronDB components to listen on these ports in the firewall.
Execute the command as the root user:
systemctl stop firewalld
systemctl disable firewalld
2.3 [kunlun1, kunlun2, kunlun3] Create the kunlun group and the kunlun users.
It is strongly recommended that system administrators create dedicated operating system users on each server where the KlustronDB cluster is deployed to start and run various KlustronDB components, rather than using existing operating system users. Additionally, the owner of the data directories for each KlustronDB component should also be this user. This is the basic requirement for data security in Klustron.
For the sake of convenience in description, this article designates the username specially created by the system administrator on each server deploying the KlustronDB database cluster as 'kunlun'. To ensure data security, the system administrator should prohibit other regular users from reading and writing to the data directories of the 'kunlun' user.
Use root to execute the command to create the KlustronDB operating system user kunlun and set the user password:
useradd --create-home --shell /bin/bash kunlun
passwd kunlun
2.4 [kunlun1, kunlun2, kunlun3] Create the software installation directory /kunlun and set the directory's group ownership to kunlun:kunlun.
Run the following command as root:
mkdir /kunlun
chown -R kunlun:kunlun /kunlun
2.5 [kunlun1, kunlun2, kunlun3] Modify operating system parameters.
When the KlustronDB database system has a high load or stores a large amount of data, it usually needs to open a large number of files, so the following settings are required.
Run the following command as root.
vi /etc/security/limits.conf
#加入下面的行:
* soft nofile 65536
* hard nofile 200000
2.6 [kunlun1, kunlun2, kunlun3] allows kunlun users to execute root commands with sudo without a password.
This permission is only temporarily required on all servers where the KlustronDB cluster is to be installed, because the KlustronDB installation tool needs to copy KlustronDB component files to these servers and SSH into each server to execute some commands described in the following section during the installation of the KlustronDB cluster. Once the KlustronDB cluster installation is complete, this permission for the kunlun user can be revoked on all these servers.
The following text references some fragments from the KlustronDB cluster deployment configuration file template JSON file in Section 3.1, so it is recommended that readers first glance at the JSON file in Section 3.1 before continuing reading from here.
The current installation tool will automatically create a working directory on each working machine (i.e., the basedir in the machines configuration), and perform operations such as changing the directory owner. When the --sudo option is passed to the installation tool (setup_cluster_manager.py), it will execute these privileged commands using sudo to prevent the installation process from failing due to insufficient permissions of the specified kunlun user. If on each server of the KlustronDB cluster, the working directory (basedir) is set up so that the kunlun user (i.e., the user specified in the machines configuration) has permission to create and manage it, then this kunlun user does not need passwordless sudo.
In addition, the server where XPanel is installed needs to run Docker, so the kunlun user on this machine needs to be granted passwordless sudo permissions to run Docker, without full passwordless sudo permissions. Furthermore, this permission needs to be retained permanently and cannot be revoked after installation.
Run the following command as root.
vi /etc/sudoers
#在最后加上下面的内容:
Kunlun ALL=(ALL) NOPASSWD: ALL
2.7 Configure passwordless SSH authentication for user kunlun on kunlun1 to users kunlun on kunlun2 and kunlun3.
For the same reason as in Section 2.6, the step to which this section belongs is required. Additionally, the public key file of the kunlun user on the management server (that is, the server running the installation tool, in this case kunlun1) needs to always exist on the servers used by the KlustronDB cluster, so that operations such as starting or stopping the entire cluster or some of its components can be performed.
Log in to the server kunlun1 as the kunlun user and execute the following command:
ssh-keygen -t rsa
After running this command, you can just press Enter at all the places that require input. Once successful, two files, id_rsa and id_rsa.pub, will be generated in the .ssh directory under the home directory of the kunlun user. The id_rsa file is used to store the private key, while id_rsa.pub is used to store the public key.
Copy the public key of the kunlun user on the kunlun1 server to the kunlun1, kunlun2, and kunlun3 servers
ssh-copy-id -i  .ssh/id_rsa.pub kunlun@192.168.40.151
ssh-copy-id -i  .ssh/id_rsa.pub kunlun@192.168.40.152
ssh-copy-id -i  .ssh/id_rsa.pub kunlun@192.168.40.153
Execute a command on kunlun1 to verify the passwordless login of the kunlun user to kunlun1, kunlun2, and kunlun3
ssh 192.168.40.151 date
ssh 192.168.40.152 date
ssh 192.168.40.153 date
2.8 [kunlun1, kunlun2, kunlun3] Install tools such as python2, git, and wget.
Execute the following command as root:
yum -y install python git wget yum-utils
2.9 [kunlun1] Since there are plans to deploy xpanel on kunlun1, it is necessary to install and set up Docker in advance.
Run the following command as root:
Remove the system's built-in docker-related RPMs
yum remove docker \
        docker-client \
        docker-client-latest \
        docker-common \
        docker-latest \
        docker-latest-logrotate \
        docker-logrotate \
        docker-engine
Switch to Alibaba mirror
yum-config-manager \
    --add-repo \
    http://mirrors.aliyun.com/docker-ce/linux/centos/docker-ce.repo
Install Docker Community Edition
yum -y install docker-ce docker-ce-cli containerd.io
Start Docker and set it to start automatically with the operating system
systemctl start docker
systemctl enable docker
2.10 [kunlun1] Create the directory /softwares and assign the appropriate permissions, then use it to store the installation media related to KlustronDB.
Run the following command as root:
mkdir /softwares
2.11 [kunlun1] Use git to pull the latest code and store it in the /softwares directory.
Execute using the root user (here we assume that the latest 1.3.2 is installed; for others, refer to the installation documentation of previous versions):
cd /softwares
git clone -b v1.3.2 https://gitee.com/zettadb/cloudnative.git
2.12 [kunlun1] Download and install the required software packages.
Run the following command as root:
cd /softwares/cloudnative/cluster
python setup_cluster_manager.py --action=download --downloadsite=devsite --downloadtype=release
3. KlustronDB Installation
3.1 [kunlun1] Using kunlun to allow users to modify files /softwares/cloudnative/cluster/cluster_and_node_mgr.json, add the relevant configuration information
{
    "machines":[
        {
            "ip":"192.168.40.151",
            "basedir":"/kunlun",
            "user":"kunlun"
        },
        {
            "ip":"192.168.40.152",
        	"basedir":"/kunlun",
            "user":"kunlun"
        },
        {
            "ip":"192.168.40.153",
            "basedir":"/kunlun",
            "user":"kunlun"
        }
    ],
    "meta":{
    	"ha_mode": "rbr",
        "nodes":[
         {
         "ip":"192.168.40.151"
                },
                {
         "ip":"192.168.40.152"
                },
                {
         "ip":"192.168.40.153"
                }
        ]
    },
    "cluster_manager": {
           "nodes": [
        {
         "ip": "192.168.40.151"
        },
        {
         "ip": "192.168.40.152"
        },
        {
         "ip": "192.168.40.153"
        }
        ]
    },
    "node_manager": {
           "nodes": [
        {
         "ip": "192.168.40.151"
        },
        {
         "ip": "192.168.40.152"
        },
        {
         "ip": "192.168.40.153"
        }
        ]
    },
    "xpanel": {
    "ip": "192.168.40.151",
    "image": "registry.cn-hangzhou.aliyuncs.com/kunlundb/kunlun-xpanel:VERSION"
    }
}
3.2 [kunlun1] Generate installation script.
Execute the following command using the kunlun user
cd /softwares/cloudnative/cluster
python setup_cluster_manager.py --autostart --config=cluster_and_node_mgr.json --action=install
3.3 [kunlun1] Run the installation script.
Execute the following command using the kunlun user
bash -e /softwares/cloudnative/cluster/clustermgr/install.sh
If an error occurs while running the script, refer to 3.4 to clean up the intermediate installation results, and re-run the installation script after the problem has been fixed.
3.3 [kunlun1] Generate the startup database script. Use the kunlun user to execute the following command
cd /softwares/cloudnative/cluster
python setup_cluster_manager.py --autostart --config=cluster_and_node_mgr.json --action=start
bash -e /softwares/cloudnative/cluster/clustermgr/start.sh
3.4 [kunlun1] Generate the script to shut down the database. Execute the following command using the kunlun user
cd /softwares/cloudnative/cluster
python setup_cluster_manager.py --autostart --config=cluster_and_node_mgr.json --action=stop
bash -e /softwares/cloudnative/cluster/clustermgr/stop.sh
**3.5 **[kunlun1] If step 3.3 fails to run the installation script, you can generate the cleanup script using the command below and run the cleanup step.
Execute the following command using the kunlun user
cd /softwares/cloudnative/cluster

python setup_cluster_manager.py --autostart --config=cluster_and_node_mgr.json --action=clean

bash /softwares/cloudnative/cluster/clustermgr/clean.sh
3.6 Log in to the XPanel console. On a machine that can access 192.168.40.151, open the browser and enter the address: http://192.168.40.151:18080/KunlunXPanel/#/login?redirect=/dashboard
The initial login username and password are: super_dba/super_dba. The super_dba password needs to be changed upon first login.
After logging in, the homepage is displayed as follows: _
3.7 Click 'Computer Management' and 'Computer List' on the left control panel to display the following interface.
Check that all machines are online 
3.8 Add a cluster.
Click 'Cluster Management', 'Cluster List', and then click the 'Add' button _
Add cluster parameters as shown in the figure below: _ Click "Confirm" to check the completion status of the cluster creation task.

 After completing the cluster installation, you can use the database.
3.9 Initial User Accounts of Kluscomp instances
If, when creating a cluster, the username and password for the Kluscomp instances are explicitly set in the extension options as shown in the figure below, the installer will automatically create this user on all Kluscomp instances of the cluster and set its password to the specified password.
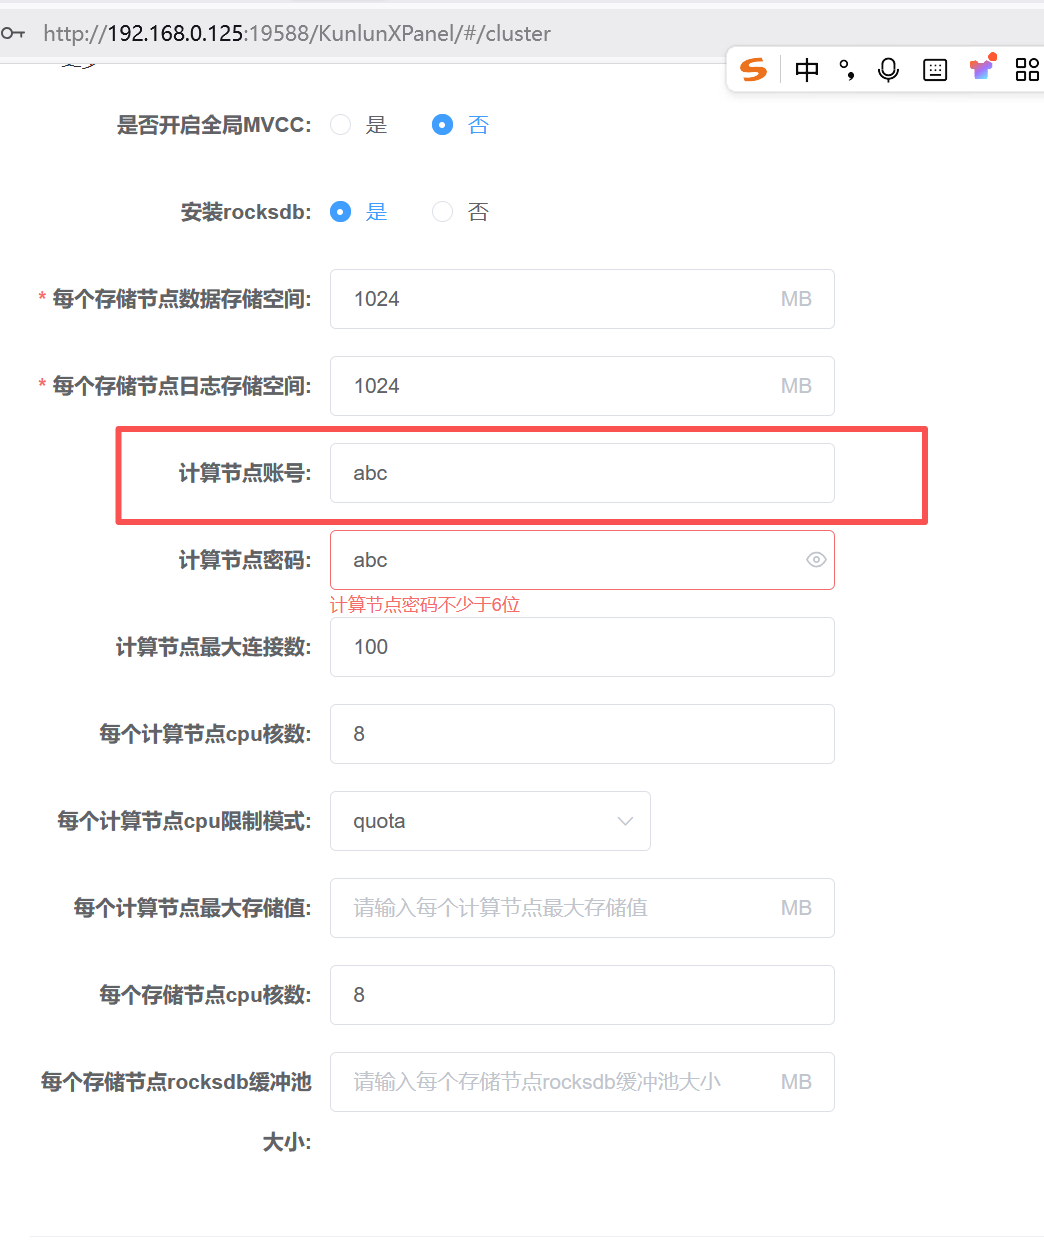
If no username and password are explicitly set for the Kluscomp instances when creating the cluster, the installer will automatically create a user with the username 'abc' and the password 'abc'. For security reasons, the DBA needs to connect to the Kluscomp instances using psql after the cluster is created and reset the password for the 'abc' user to a stronger password.
After the cluster is successfully created, users can use the above automatically created username to connect to any Kluscomp instance of the cluster using psql and execute the CREATE USER statement to create more user accounts. All created user accounts automatically take effect on both current and future added Kluscomp instances, without the need to log in to each Kluscomp instance to create them repeatedly.
If the administrator account of the Kluscomp instance is forgotten, you need to use 初始化这个KlustronDB集群时为该集群设置的操作系统用户名 to log in to the server where a Kluscomp instance of this cluster is located, and then use psql to connect to the Kluscomp instance following the commands below to create the required user account. The your_comp_node_port can be seen on the cluster information page of XPanel, and you can also use the ps -ef|grep postgres command to see the port each Kluscomp instance instance is listening on and its data directory.
psql -h 127.0.0.1 -p your_comp_node_port postgres
For security reasons, the DBA can edit the pg_hba.conf file in the 每一个计算节点 data directory of the cluster to restrict the network access permissions of user accounts on the Kluscomp instances.