
Klustron Architecture Overview and Cluster Deployment
Klustron Architecture Overview and Cluster Deployment
01 Architecture Introduction and Terminology
1.1 Architecture Introduction
Klustron System Architecture:
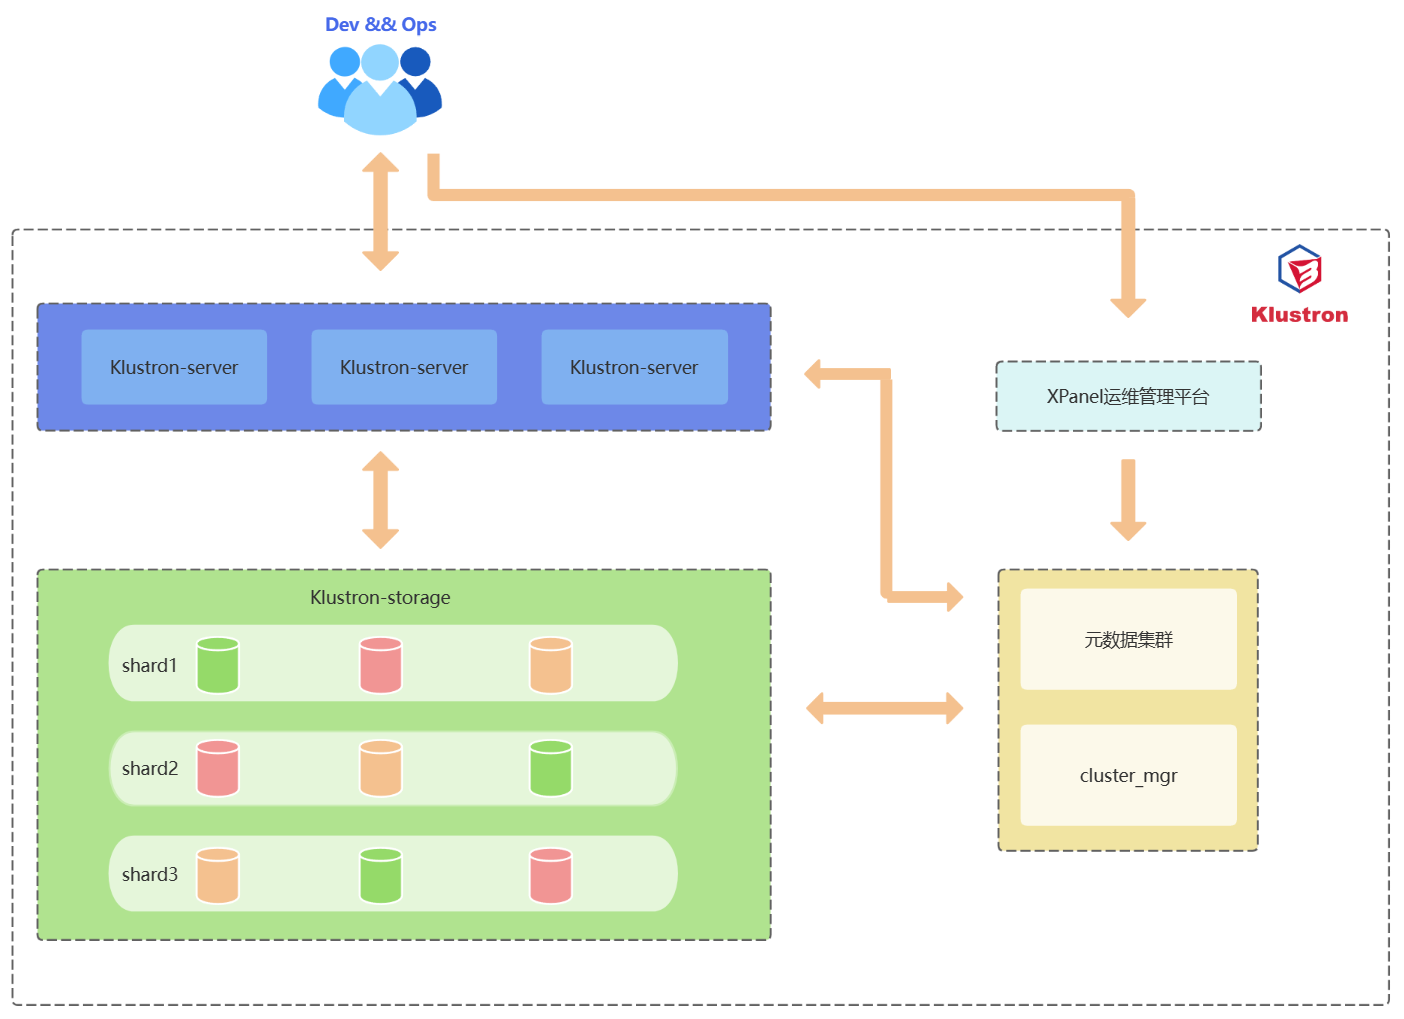
1.2 Component Introduction
Introduction to Klustron Cluster Components:
| Component Name | Function |
|---|---|
| Klustron-server | Acts as a compute node, responsible for receiving requests from application clients, processing results returned from storage nodes, and ultimately delivering results back to the clients. Compute nodes are stateless and typically configured within a load balancer. In case of compute node failure, the load balancer directs requests to other functioning nodes to continue servicing application client requests. |
| Klustron-storage | The storage cluster is responsible for data persistence and financial-grade data consistency. It consists of 2 or more shards, with each shard having 3 replicas: one primary and two replicas. The primary node accepts read and write requests from compute nodes, executes these requests, and returns the results. |
| Metadata Cluster | Responsible for storing the Klustron cluster's topology, node connection information, DDL logs, commit logs, and other cluster management logs. |
| cluster_mgr | Maintains accurate cluster and node states, manages cluster administration, logical and physical backups and recovery, and horizontal scaling functions. |
| XPanel | A GUI tool that provides a web-based cluster management platform, allowing DBAs to easily perform most database maintenance and management tasks with a few clicks. |
| node_mgr | node_mgr executes commands on corresponding machine nodes as directed by cluster_mgr, and regularly reports the heartbeat information of the cluster primary node. Every machine node has a node_mgr. |
1.3 Terminology Introduction
Klustron Terminology:
| Term | Explanation |
|---|---|
| Cluster | In Klustron, a cluster is composed of several compute nodes and several storage cluster shards. For example, Cluster A consists of 3 compute nodes and 2 storage cluster shards. |
| Compute Node / Klustron-server / CN | Responsible for receiving requests from application clients, processing the results returned by storage nodes, and ultimately returning the results to the clients. Each compute node is stateless and independent. The cluster has multiple compute nodes integrated with a load balancer, so the failure of a single compute node does not impact the cluster, which continues to provide read and write services. |
| Storage Cluster / Klustron-storage / Shard | A Klustron cluster contains one or more shards, each storing a part of user data, with no overlap between different shards. Each shard has one primary node and several backup nodes, achieving high availability through binlog replication. |
| Storage Node | Used to store user business data and is a running instance of a kunlun-storage component. Several storage nodes make up a shard, operating as either a primary or a backup node within the shard. |
| Metadata Cluster / Metadata Shard | A replication group composed of multiple storage nodes, used to manage the metadata of the Klustron cluster, not for storing user business data. The metadata cluster operates as a replication group during runtime and can serve multiple Klustron clusters. |
| cluster_mgr / Cluster Manager | This node is responsible for receiving Klustron cluster operation and management requests from clients, completing these requests by sending actual actions to various node managers. |
| XPanel | A web application running in a docker image, allowing users to connect via a browser to perform cluster management operations. |
| node_mgr / Node Manager | A local command execution node deployed on each working machine, which receives requests from the cluster manager and performs various operations on storage nodes, compute nodes, and other Klustron components on the machine, including but not limited to installation, deletion, stopping, backup, etc. |
02 Standard Cluster Deployment
2.1 Pre-Deployment Requirements
2.1.1 Operating System and CPU Architecture
| Operating System Version | CPU Architecture (x86_64/AMD64/ARM64) |
|---|---|
| CentOS 7.5 and above | x86_64 ARM64 |
| CentOS 8 | x86_64 ARM64 |
| UnionTech OS V20 (1050a) | AMD64 ARM64 |
| UnionTech OS V20 (1050e) | AMD64 ARM64 |
| openSUSE 15 | x86_64 |
| Ubuntu 20.04 | x86_64 |
| Kylin v10 | x86_64 ARM64 |
2.1.2 Server Configuration
Recommended Configuration for Testing and Development Environments
For development and testing environments, it is recommended to use at least three machines, each capable of deploying multiple types of components. Below are the specific requirements for various components:
| Component | CPU | Memory | Disk Type and Available Space | Network | Number of Deployment | Deployment Notes |
|---|---|---|---|---|---|---|
| Klustron-server | 4 | 8G+ | SAS,20G+ | Gigabit NIC | 1 | Can be co-deployed with the storage cluster |
| Klustron-storage | 4 | 8G+ | SAS,20G+ | Gigabit NIC | 1 | A storage cluster requires a minimum of three nodes: one primary and two replicas |
| Metadata Cluster | 4 | 8G+ | SAS,20G+ | Gigabit NIC | 1 | Can be co-deployed with the storage cluster |
| cluster_mgr | 2 | 4G+ | SAS,20G+ | Gigabit NIC | 1 | Can be co-deployed with the storage cluster |
| XPanel | 2 | 4G+ | SAS,10G+ | Gigabit NIC | 1 | Can be co-deployed with the storage cluster |
| node_mgr | 1 | 2G+ | SAS,10G+ | Gigabit NIC | 1 | Automatically deployed on every machine |
Configuration Requirements for Production Environments
For production environments, at least six machines are required; if resources permit, it is advisable to use nine machines, comprising 3 compute nodes and 6 storage nodes, with other components co-deployed with storage nodes. Below are the specific requirements for various components:
| Component | CPU | Memory | Disk Type and Available Space | Network | Number of Deployment | Deployment Notes |
|---|---|---|---|---|---|---|
| Klustron-server | 16 | 32G+ | SSD,20G+ | 10 Gigabit NIC | 3 | Deployed independently |
| Klustron-storage | 8 | 32G+ | SSD,200G+ | 10 Gigabit NIC | 3 | A storage cluster requires a minimum of three nodes: one primary and two replicas. |
| Metadata Cluster | 4 | 8G+ | SSD,50G+ | 10 Gigabit NIC | 1 | Can be co-deployed with the storage cluster |
| cluster_mgr | 4 | 8G+ | SSD,20G+ | 10 Gigabit NIC | 1 | Can be co-deployed with the storage cluster |
| XPanel | 4 | 8G+ | SSD,10G+ | 10 Gigabit NIC | 1 | Can be co-deployed with compute nodes |
| node_mgr | 1 | 2G+ | SSD,10G+ | 10 Gigabit NIC | 1 | Automatically deployed on every machine |
2.1.3 Network Configuration
| Component | Default Port/Port Range | Port Description |
|---|---|---|
| Klustron-server | 47000-48000 | Port range for pg or mysql client connection access provided by the compute node |
| Klustron-storage | 57000-58000 | Port range for storage node communication |
| Metadata Cluster | 6001 | Communication port for accessing the Metadata Cluster |
| cluster_mgr | 58000 | Raft protocol port for cluster_mgr |
| cluster_mgr | 58001 | HTTP protocol port for cluster_mgr |
| cluster_mgr | 59010 | Default Prometheus port for cluster_mgr |
| XPanel | 18080 | Access port for the XPanel management platform |
| node_mgr | 58002 | Default HTTP port for node_mgr |
| node_mgr | 58003 | Default TCP port for node_mgr |
| node_mgr | 58010 | Default Prometheus port for node_mgr |
2.2 Online Deployment
2.2.1 Pre-deployment Preparation - Operations on All Machines
Preparation steps need to be performed on each machine.
Remove System-Installed MariaDB
Run the following commands as root:
yum remove postfix
rpm -e mariadb-libs
Disable the Firewall
Execute the following commands as root:
systemctl stop firewalld
systemctl disable firewalld
Create the kunlun Group and User
Execute the following commands as root and set the user password:
useradd --create-home --shell /bin/bash kunlun
passwd kunlun
Create Relevant Directories and Set Ownership
Create the software installation directory /data1/kunlun, which can be created according to user-defined standards. Here it is assumed the disk is mounted at the /data1 directory, and the directory’s group is set to kunlun.
Execute the following commands as root:
mkdir -p /data1/kunlun /data1/softwares

# /data1/kunlun is the directory where components are installed after deployment, /data1/softwares is the directory for storing installation packages, related scripts, and files before deployment

chown -R kunlun:kunlun /data1/kunlun /data1/softwares
Modify System File Handles
Execute the following command as root:
vim /etc/security/limits.conf
Add the following at the end of the file:
* soft nofile 65536
* hard nofile 200000
Set kunlun User to Execute Root Commands Without a Password via sudo
Execute the following command as root:
visudo
# Add the following at the end:
kunlun ALL=(ALL) NOPASSWD: ALL
2.2.2 Pre-deployment Preparation - Operations on the Control Machine
The preparation steps only need to be performed on the control machine.
Set up SSH Trust Relationships Between the Control Machine and Other Machines
Execute the following command as the kunlun user on the control machine:
ssh-keygen -t rsa
After running the command, press Enter at all prompts. This will generate two files in the .ssh directory under /home/kunlun/: id_rsa (the private key file) and id_rsa.pub (the public key file).
Copy the public key from the control machine to the other servers, including the control machine itself:
ssh-copy-id -i ~/.ssh/id_rsa.pub 192.168.40.151
ssh-copy-id -i ~/.ssh/id_rsa.pub 192.168.40.152
ssh-copy-id -i ~/.ssh/id_rsa.pub 192.168.40.153
Verify passwordless login from the control machine to the other machines by executing:
ssh 192.168.40.151 date
ssh 192.168.40.152 date
ssh 192.168.40.153 date
Install tools such as Python2, git, and wget
Execute the following command as root:
yum -y install python git wget yum-utils
Deploy XPanel
Since XPanel is planned to be deployed on the control machine, Docker needs to be installed and deployed in advance.
Execute the following command as root:
Remove system-installed Docker-related rpms:
yum remove docker \
        docker-client \
        docker-client-latest \
        docker-common \
        docker-latest \
        docker-latest-logrotate \
        docker-logrotate \
        docker-engine
Switch to the Alibaba Cloud mirror:
yum-config-manager --add-repo http://mirrors.aliyun.com/docker-ce/linux/centos/docker-ce.repo
Install the community edition of Docker:
yum -y install docker-ce docker-ce-cli containerd.io
Start Docker and set it to automatically start with the operating system:
systemctl start docker
systemctl enable docker
Download the latest deployment tools
Download the deployment tools to the /data1/softwares directory, execute as root:
cd /data1/softwares
git clone -b 1.1 https://gitee.com/zettadb/cloudnative.git
Download the necessary software packages
Execute the following command as root:
cd /data1/softwares/setuptools-36.5.0/cloudnative/cluster/clustermgr
wget http://zettatech.tpddns.cn:14000/thirdparty/hadoop-3.3.1.tar.gz
wget http://zettatech.tpddns.cn:14000/thirdparty/jdk-8u131-linux-x64.tar.gz
wget http://zettatech.tpddns.cn:14000/thirdparty/mysql-connector-python-2.1.3.tar.gz
wget http://zettatech.tpddns.cn:14000/thirdparty/prometheus.tgz
wget http://zettatech.tpddns.cn:14000/thirdparty/haproxy-2.5.0-bin.tar.gz
wget http://zettatech.tpddns.cn:14000/thirdparty/efk/filebeat-7.10.1-linux-x86_64.tar.gz


VERSION=1.1.2
wget http://downloads.Klustron.com//releases/$VERSION/release-binaries/kunlun-cluster-manager-$VERSION.tgz
wget http://downloads.Klustron.com//releases/$VERSION/release-binaries/kunlun-node-manager-$VERSION.tgz
wget http://downloads.Klustron.com//releases/$VERSION/release-binaries/kunlun-server-$VERSION.tgz
wget http://downloads.Klustron.com//releases/$VERSION/release-binaries/kunlun-storage-$VERSION.tgz
wget http://downloads.Klustron.com//releases/$VERSION/release-binaries/kunlun-proxysql-$VERSION.tgz

chown -R kunlun:kunlun /data1/softwares/
2.2.3 Deployment and Installation
Edit the deployment topology JSON file
On the control machine, use the kunlun user to modify the file /data1/softwares/setuptools-36.5.0/cloudnative/cluster/cluster_and_node_mgr.json with relevant configuration information. Here we use the machines at 192.168.40.151 (control machine), 192.168.40.152, and 192.168.40.153 as examples.
{
    "machines":[
        {
            "ip":"192.168.40.151",
            "basedir":"/data1/kunlun",
            "user":"kunlun"
        },
        {
            "ip":"192.168.40.152",
            "basedir":"/data1/kunlun",
            "user":"kunlun"
        },
        {
            "ip":"192.168.40.153",
            "basedir":"/data1/kunlun",
            "user":"kunlun"
        }
    ],
    "meta":{
        "ha_mode": "rbr",
        "nodes":[
         {
         "ip":"192.168.40.151"
                },
                {
         "ip":"192.168.40.152"
                },
                {
         "ip":"192.168.40.153"
                }
        ]
    },
    "cluster_manager": {
           "nodes": [
        {
         "ip": "192.168.40.151"
        },
        {
         "ip": "192.168.40.152"
        },
        {
         "ip": "192.168.40.153"
        }
        ]
    },
    "node_manager": {
           "nodes": [
        {
         "ip": "192.168.40.151"
        },
        {
         "ip": "192.168.40.152"
        },
        {
         "ip": "192.168.40.153"
        }
        ]
    },
    "xpanel": {
    "ip": "192.168.40.151",
    "image": "registry.cn-hangzhou.aliyuncs.com/kunlundb/kunlun-xpanel:1.1.2"
    }
}
Execute the Installation
Generate the installation script
On the control machine, use the kunlun user to execute the following command:
cd /data1/softwares/setuptools-36.5.0/cloudnative/cluster
sudo python2 setup_cluster_manager.py --autostart --config=cluster_and_node_mgr.json --product_version=$version --action=install
# $version refers to the cluster version to install, for example: 1.1.2
Example:
sudo python2 setup_cluster_manager.py --autostart --config=cluster_and_node_mgr.json --product_version=1.1.2 --action=install
Run the installation script
On the control machine, use the kunlun user to execute the following command:
bash -e /data1/softwares/setuptools-36.5.0/cloudnative/cluster/clustermgr/install.sh
Log in to XPanel for Cluster Creation
Access the XPanel console via a browser on a machine that can access 192.168.40.151. Open a browser and enter the URL: http://192.168.40.151:18080/KunlunXPanel
The initial login username and password are: super_dba/super_dba. You will need to change the super_dba password upon first login.
After logging in, the homepage appears as shown below:
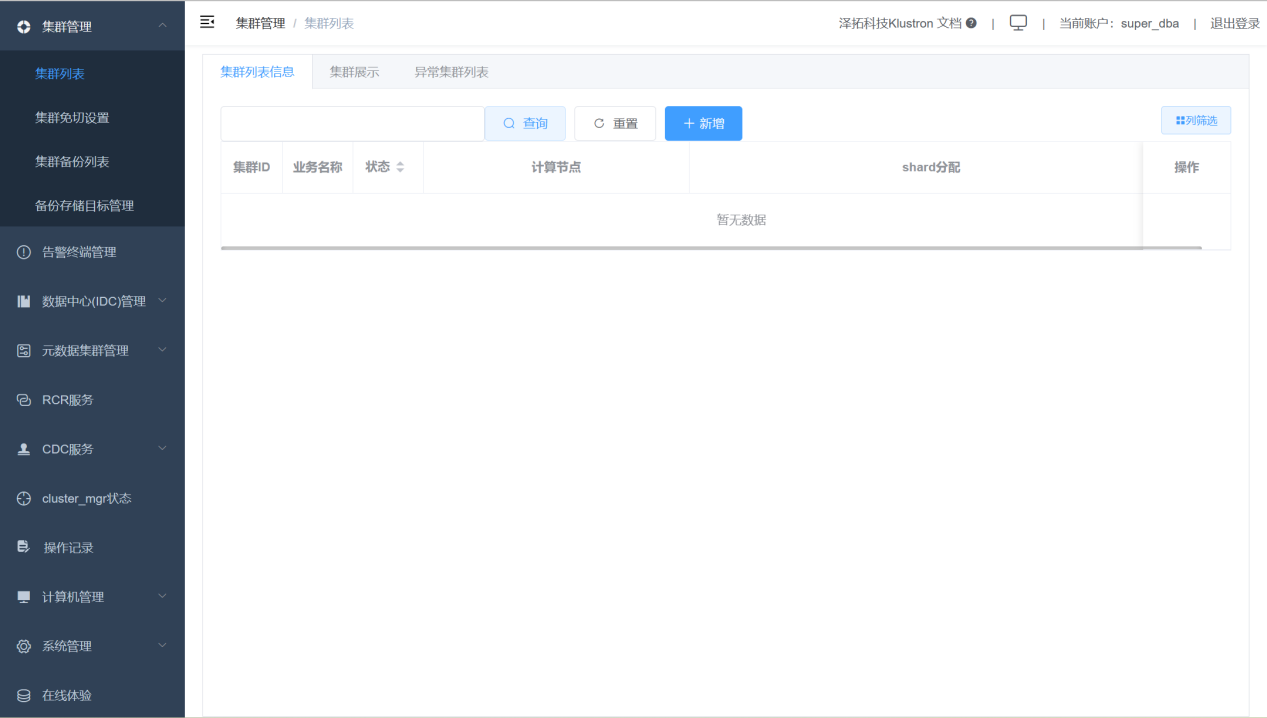
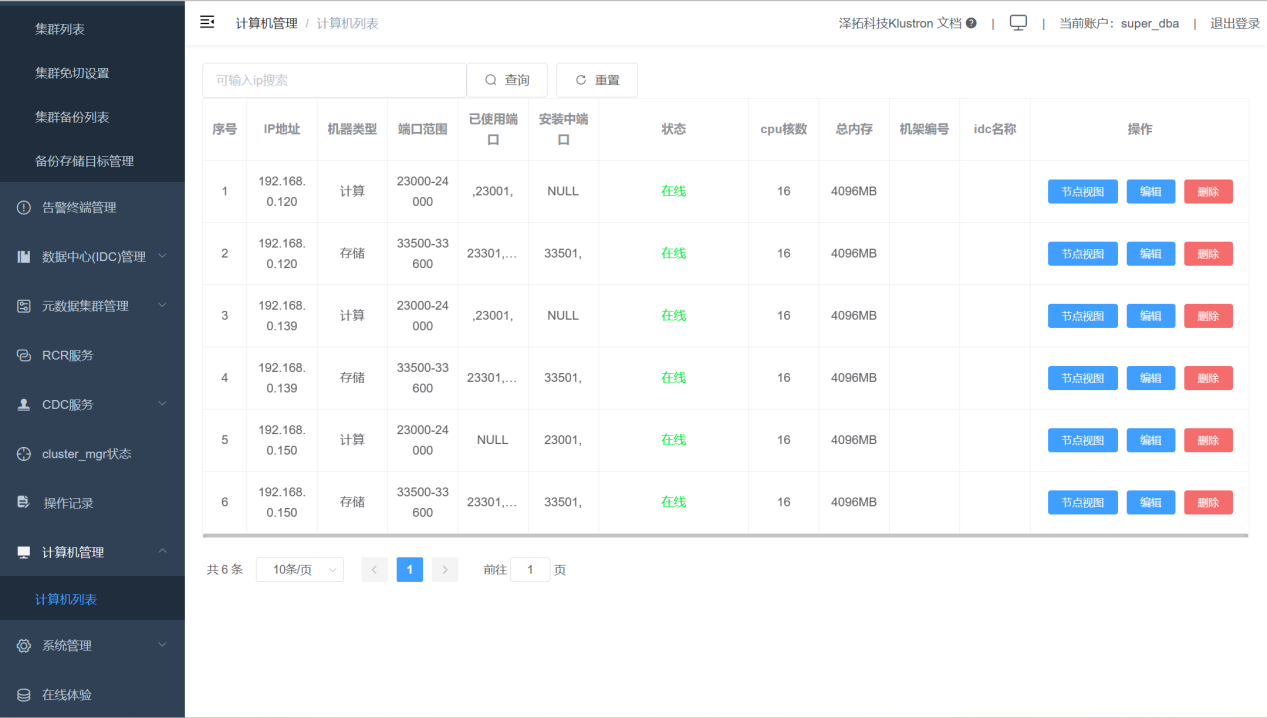
Click on the "Computer Management" then "Computer List" on the left control bar, displaying the following interface.
Check that all machines are online:
Add a cluster.
Click "Cluster Management," "Cluster List," then click the "Add" button.
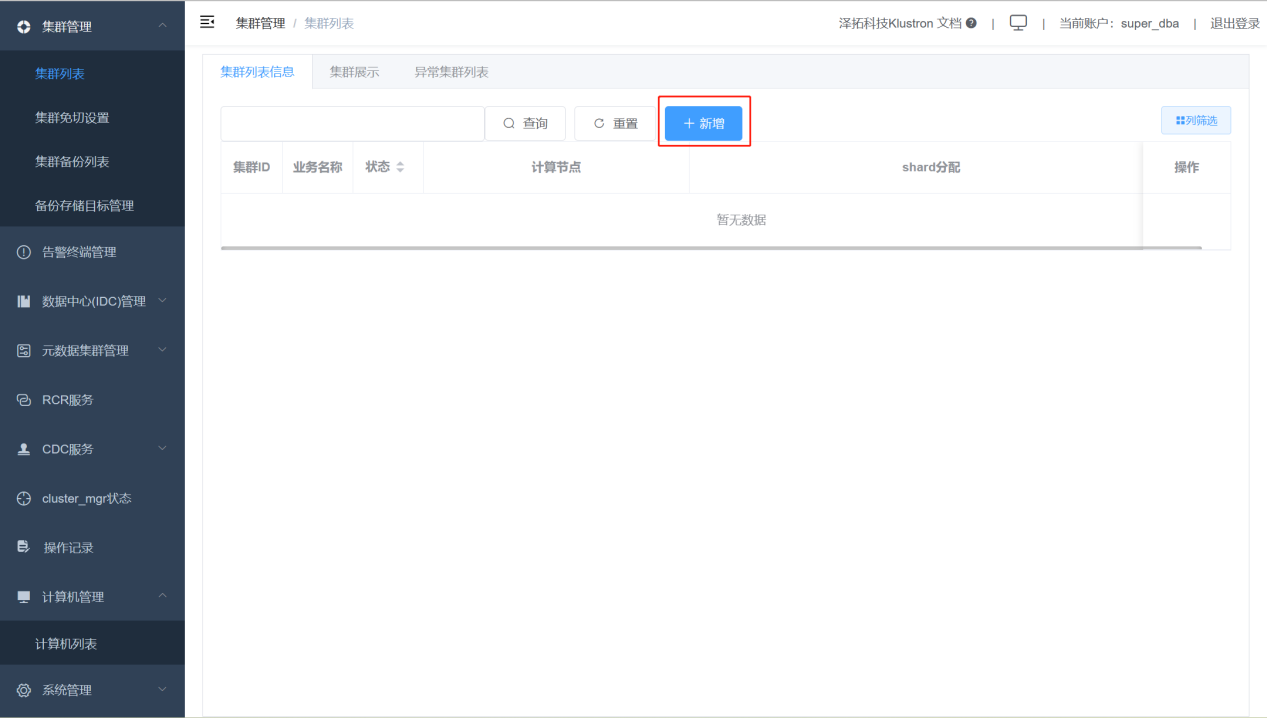
Add cluster parameters as shown below:
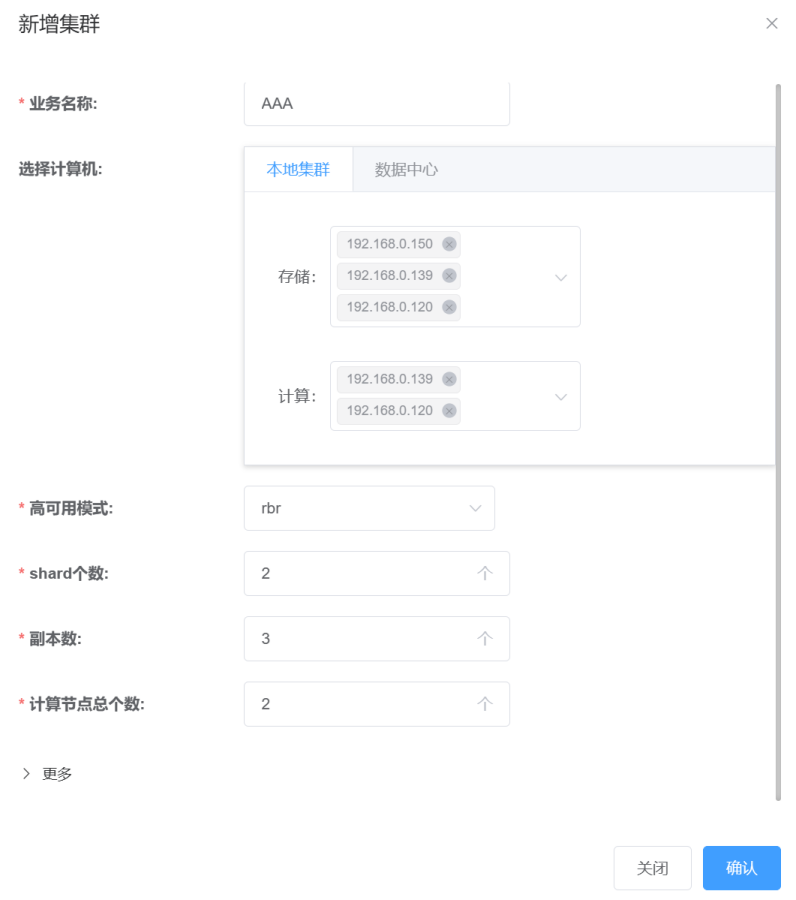

After completing the cluster installation, you can use the Klustron Cluster by connecting to the compute node's IP and port. The default username and password are abc. After logging in, users can create new users and change passwords as per their needs.
PostgreSQL and MySQL Protocol Login Verification
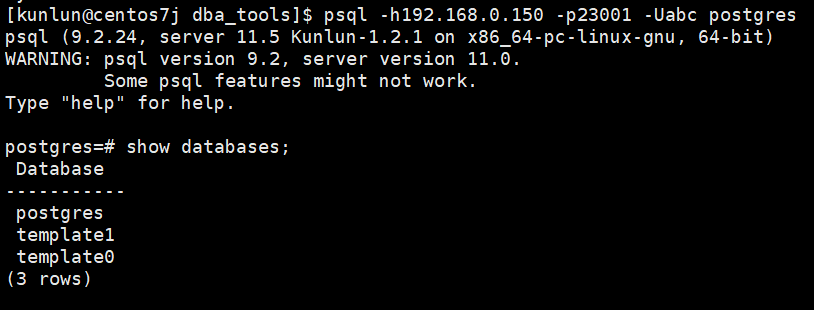
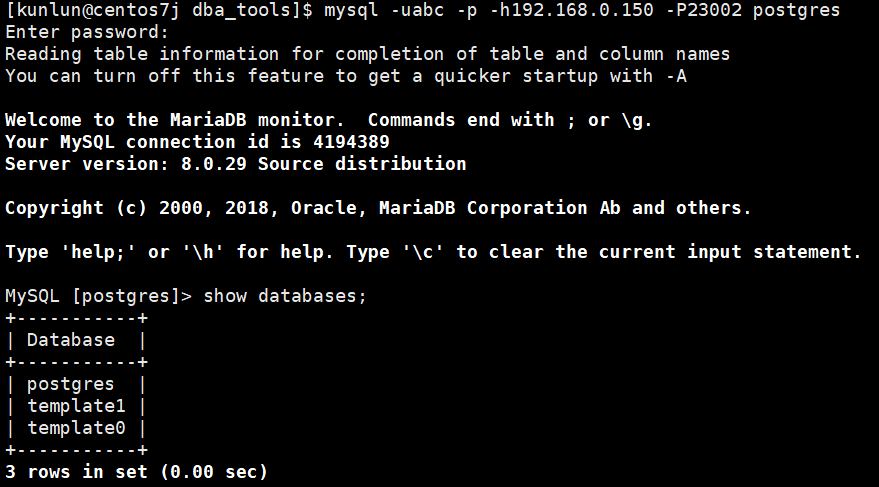
Tips: PostgreSQL and MySQL protocols use different ports for login access, details can be seen in XPanel under "Cluster List" -> "Settings" -> "Compute Node List."
PostgreSQL login verification:
psql -h192.168.0.150 -p23001 -Uabc postgres
As shown:
MySQL login verification:
mysql -uabc -p -h192.168.0.150 -P23002 postgres
As shown:
2.3 Offline Deployment
2.3.1 Pre-deployment Preparation - Operations on All Machines
Preparation steps need to be performed on each machine.
Remove system-installed MariaDB
Run the following commands as root:
yum remove postfix
rpm -e mariadb-libs
Disable the firewall
Execute the following commands as root:
systemctl stop firewalld
systemctl disable firewalld
Create the kunlun group and kunlun user
Execute the following commands as root and set the user password:
useradd --create-home --shell /bin/bash kunlun

passwd kunlun
Create relevant directories and set ownership
Create the software installation directory /data1/kunlun, which can be created according to user-defined standards. Here, assuming the disk is mounted at the /data1 directory, and the directory’s group is set to kunlun.
Execute the following commands as root:
mkdir -p /data1/kunlun /data1/softwares
# /data1/kunlun for directories after component installation, /data1/softwares for storing installation packages, related scripts, and files before deployment
chown -R kunlun:kunlun /data1/kunlun /data1/softwares
Modify system file handles
Execute the following command as root:
vim /etc/security/limits.conf
Add the following at the end of the file:
* soft nofile 65536

* hard nofile 200000
Set kunlun user to execute root commands without a password via sudo
Execute the following command as root:
visudo
# Add the following at the end:
kunlun ALL=(ALL) NOPASSWD: ALL
2.3.2 Pre-deployment Preparation - Operations on the Control Machine
The preparation steps only need to be performed on the control machine.
Set up SSH trust relationships between the control machine and other machines
Execute the following command as the kunlun user on the control machine:
ssh-keygen -t rsa
After running the command, press Enter at all prompts. This will generate two files in the .ssh directory under /home/kunlun/: id_rsa (the private key file) and id_rsa.pub (the public key file).
Copy the public key from the control machine to the other servers, including the control machine itself:
ssh-copy-id -i ~/.ssh/id_rsa.pub 192.168.40.151
ssh-copy-id -i ~/.ssh/id_rsa.pub 192.168.40.152
ssh-copy-id -i ~/.ssh/id_rsa.pub 192.168.40.153
Verify passwordless login from the control machine to the other machines by executing:
ssh 192.168.40.151 date
ssh 192.168.40.152 date
ssh 192.168.40.153 date
Install tools such as Python2, git, and wget
Execute the following command as root:
yum -y install python git wget yum-utils
Install Docker service
Since XPanel is planned to be deployed on the control machine, Docker needs to be installed and deployed in advance.
Execute the following command as root:
Remove system-installed Docker-related rpms:
yum remove docker \
        docker-client \
        docker-client-latest \
        docker-common \
        docker-latest \
        docker-latest-logrotate \
        docker-logrotate \
        docker-engine
Install the community edition of Docker:
yum -y install docker
Start Docker and set it to automatically start with the operating system:
systemctl start docker
systemctl enable docker
Upload installation tools and packages to the server
Download and package the latest deployment tools and installation packages online, or download the corresponding offline deployment packages after consulting the Klustron team
Online download and packaging (taking version v1.2.2 as an example, download the corresponding version based on actual requirements):
Download the deployment tools to the /data1/softwares directory, execute as root:
cd /data1/softwares
git clone -b 1.1 https://gitee.com/zettadb/cloudnative.git
Download the necessary software packages
Execute the following command as root:
cd /data1/softwares/setuptools-36.5.0/cloudnative/cluster/clustermgr
wget http://zettatech.tpddns.cn:14000/thirdparty/hadoop-3.3.1.tar.gz
wget http://zettatech.tpddns.cn:14000/thirdparty/jdk-8u131-linux-x64.tar.gz
wget http://zettatech.tpddns.cn:14000/thirdparty/mysql-connector-python-2.1.3.tar.gz
wget http://zettatech.tpddns.cn:14000/thirdparty/prometheus.tgz
wget http://zettatech.tpddns.cn:14000/thirdparty/haproxy-2.5.0-bin.tar.gz
wget http://zettatech.tpddns.cn:14000/thirdparty/efk/filebeat-7.10.1-linux-x86_64.tar.gz


VERSION=1.2.2
wget http://downloads.Klustron.com//releases/$VERSION/release-binaries/kunlun-cluster-manager-$VERSION.tgz
wget http://downloads.Klustron.com//releases/$VERSION/release-binaries/kunlun-node-manager-$VERSION.tgz
wget http://downloads.Klustron.com//releases/$VERSION/release-binaries/kunlun-server-$VERSION.tgz
wget http://downloads.Klustron.com//releases/$VERSION/release-binaries/kunlun-storage-$VERSION.tgz
wget http://downloads.Klustron.com//releases/$VERSION/release-binaries/kunlun-proxysql-$VERSION.tgz

chown -R kunlun:kunlun /data1/softwares/
2.3.3 Deployment and Installation
Edit the deployment topology JSON file
On the control machine, use the kunlun user to modify the file /data1/softwares/setuptools-36.5.0/cloudnative/cluster/cluster_and_node_mgr.json, adding relevant configuration information. Here we use the machines at 192.168.40.151 (control machine), 192.168.40.152, and 192.168.40.153 as examples.
A difference from the online deployment is the XPanel part; in offline deployment, there is no "image" attribute, only an "imageType": "file" attribute.
{
    "machines":[
        {
            "ip":"192.168.40.151",
            "basedir":"/data1/kunlun",
            "user":"kunlun"
        },
        {
            "ip":"192.168.40.152",
            "basedir":"/data1/kunlun",
            "user":"kunlun"
        },
        {
            "ip":"192.168.40.153",
            "basedir":"/data1/kunlun",
            "user":"kunlun"
        }
    ],
    "meta":{
        "ha_mode": "rbr",
        "nodes":[
         {
         "ip":"192.168.40.151"
                },
                {
         "ip":"192.168.40.152"
                },
                {
         "ip":"192.168.40.153"
                }
        ]
    },
    "cluster_manager": {
           "nodes": [
        {
         "ip": "192.168.40.151"
        },
        {
         "ip": "192.168.40.152"
        },
        {
         "ip": "192.168.40.153"
        }
        ]
    },
    "node_manager": {
           "nodes": [
        {
         "ip": "192.168.40.151"
        },
        {
         "ip": "192.168.40.152"
        },
        {
         "ip": "192.168.40.153"
        }
        ]
    },
    "xpanel": {
    "ip": "192.168.40.151",
    "imageType": "file"
    }
}
Execute the Installation
Generate the installation script
On the control machine, use the kunlun user to execute the following command:
cd /data1/softwares/setuptools-36.5.0/cloudnative/cluster
sudo python2 setup_cluster_manager.py --autostart --config=cluster_and_node_mgr.json --product_version=$version --action=install
# $version refers to the cluster version to install, for example: 1.2.2
Example:
sudo python2 setup_cluster_manager.py --autostart --config=cluster_and_node_mgr.json --product_version=1.2.2 --action=install
Run the installation script
On the control machine, use the kunlun user to execute the following command:
bash -e /data1/softwares/setuptools-36.5.0/cloudnative/cluster/clustermgr/install.sh
Log in to XPanel for Cluster Creation
Log in to the XPanel console via a browser on a machine that can access 192.168.40.151. Enter the address: http://192.168.40.151:18080/KunlunXPanel
The initial login username and password are: super_dba/super_dba. You will need to change the super_dba password upon first login.
After logging in, the homepage appears as shown below:
Click on "Computer Management" and then "Computer List" in the left control bar, displaying the following interface.
Check that all machines are online:
Add a cluster.
Click "Cluster Management," "Cluster List," then click the "Add" button.
Add cluster parameters as shown below:
After completing the cluster installation, you can use the Klustron Cluster by connecting to the compute node's IP and port. The default username and password are abc. After logging in, users can create new users and change passwords as per their needs.
PostgreSQL and MySQL Protocol Login Verification
Tips: PostgreSQL and MySQL protocols use different ports for login access; for specific ports, see "Cluster List" -> "Settings" -> "Compute Node List" in XPanel.
PostgreSQL login verification:
psql -h192.168.0.150 -p23001 -Uabc postgres
As shown:
MySQL login verification:
mysql -uabc -p -h192.168.0.150 -P23002 postgres
As shown:
2.4 Deployment of Other Components
2.4.1 HDFS Deployment
Single Node HDFS Deployment
HDFS Cluster Deployment